Learn how to keep your guitar in tune every time you pick it up. Tuning a guitar quickly may be easy, but how do you make sure it stays stable?

How to tune a guitar quickly and accurately, and make sure it stays that way.
Make Sure You Have a Good Guitar Setup
Instal the Strings Properly
String Selection
Check the Hardware
Check the Nut
Other Setup Considerations
Check Neck Relief
STRETCH YOUR STRINGS!!!
Break Some Strings!
How To Tune A Guitar With New Strings
A Quick Video Tutorial on String Stretching
Don’t OVERSTRETCH!
Use the Appropriate String Tension
Realize Strings Go Crazy From The Heat
The Last Step: Give Your Guitar a Final Tuning
Wrapping it Up: Now You Know How to Keep Your Guitar In Tune
How to tune a guitar quickly and accurately, and make sure it stays that way.
Here’s a scenario:
You’ve just spent the last couple of minutes with a good tuner, gone through all the strings and your guitar is now perfectly, gloriously in tune – yes!, time to play.
But after a couple of minutes of playing, things start to sound… sour. WTF? I just tuned this thing – frustrating!
Sound familiar?
There are few things more annoying to a guitar player, and listeners, than the tuning song – it can go on and on and on… (like the song that never ends).
While we do get to enjoy the occasional burst of harmonious rhythmic musicality, it seems we must still suffer through regular tuning battles that produce prolonged ear-straining, eye-squinting sounds about as enjoyable as a fork skidding across a porcelain plate.
Soooo… how to tune a guitar, keep it that way, and keep our sanity…
There are really only a couple of major considerations:
![]()
#1 – NAIL EVERYTHING DOWN WITH A GOOD GUITAR SETUP
and
#2 – STRETCH YOUR STRINGS!!!
![]()
As they say, the devil is in the details.
![]()

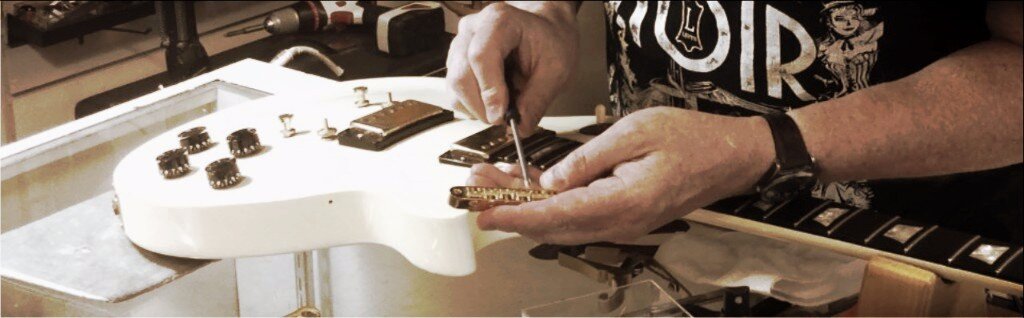
Make Sure You Have a Good Guitar Setup
Tuning stability comes down to having a decent instrument and a good guitar setup to begin with. Do yourself a favour, a BIG favour, and get a pro to setup your guitar for you. It’s easy enough to ask a few players who to go to, who they recommend. When you hear the same name coming up, you know you’re on the right track.
Getting a pro guitar setup is some of the best leveraged money you could ever spend on your instrument.
Out of the box, they ALL need help.
Why? Because the vast majority of guitars are built to tolerances designed to accommodate a wide range of playing styles – and to keep production cost-effective. Even the best recognized brand names are guilty of pumping out products that are built “within spec”.
Virtually every retailer knows new instruments still need final detailing to fit the end user. The better ones will offer a setup at no charge plus it’s good customer service. If they don’t, or try to charge you for it, consider taking your business elsewhere.
Unless you’re standing over Bob’s shoulder as he stretches the last bit of slack out of the G string on YOUR guitar during final inspection at the factory, you’re simply going to get a commoditized product that qualifies for a spot at the shipping dock.

I’m sure Bob knows how to tune a guitar (and I sincerely mean no offence to all the wonderful Bobs out there working on our favorite branded instruments), but can he guarantee it will flawlessly hold a tune when it finally reaches our eager hands?
Long story short, it still needs to be finessed just for YOU.
This also (partly) explains why one instrument might feel different from the next even though they’re the same model made in the same factory, on the same day, using the same materials.
Never underestimate the sensibilities of the human condition; we are incredibly perceptive.
This whole process of getting a good guitar setup really makes sense if you’re fairly new to the game, or perhaps technically challenged. Either way you need to aware that such a service is available – hello!
For those hardcore do-it-yourselfers out there, expounding on the benefits of a pro setup may be falling on deaf ears. But I assure you, putting your favorite guitar in the hands of a professional who’s been doing one thing exceptionally well for decades yields superior results.
The difference between a setup done by a pro and a “setup” you’ve done yourself is really a matter of taking your own ego out of the equation.
A master tech will know the soft underbelly of your guitar where the gremlins roost, places you don’t know about, places you’re afraid to go to …and he will kick them out.
![]()
![]()
Still, you can achieve great success towards keeping your guitar in tune by following the guitar setup guides and tutorials found at GuitarNiche.com. Much of the meat and potatoes can be found here and here.
Once you have the basic setup process down, or at least have gone through your own instrument top to bottom with a plan to check everything that could affect tuning, there are still a few key points to cover.
Instal the Strings Properly
Making sure your strings are properly installed is paramount, it’s job one. There’s certainly more than one right way to install strings. At the end of the day, the idea is to have them attached in such a way so that they simply don’t slip.
For the most part we’ll use a typical ball-end type of string as a reference.
Stop Tailpieces:
Pretty straight forward, the ball end should be nested cleanly in it’s allotted recess of the bar.
Bigsby Style Tailpieces:
Make sure that ball end is seated snugly up against the face of the retainer bar. Because the ball sits on a pin (typical vintage models), it has a tendency to work it’s way off before the curve of the string is trained to go around the retainer bar – yes, it can be frustrating, but it’s an essential thing to keep track of.
Strats and Teles:
Keep an eye out for the string getting hung up on the back end. Sometimes the ball end, or even the top end of the wind, will catch at the insertion point and you won’t notice it until you start tensioning up the string only to hear it go “tink”.
The string suddenly goes slack because tension overcame the hang-up finally allowing the string to seat.
Now you have a kink in the string where it first oriented to the bridge. If you continue, you will wind up with too many wraps around the post. The whole thing is suddenly compromised.
Any kind of radical deformation in a string will cause problems – guaranteed.
Acoustic guitars:
Much the same as Strats and Teles except the ball end has to seat neatly up against a bridge plate on the inside of the guitar. When first installing the strings through the top, give each string a good tug straight up – carefully, and without bending the crap out of it – after you pop in the bridge pin.
Sometimes, particularly with the heavier strings, the wrapped end will get bunged up in the hole due to the extra thickness.
Or another common hang-up is literally just that – a hang-up. The ball end will hang on the end of the bridge pin like the tab end on a tape measure – irritating as hell. The simple fix is to slightly bend the ball end of the string (a slight deformation that’s negligible and acceptable).
The other method is to chamfer the end of the bridge pin. Thankfully, many of the better guitar manufacturers took note and now provide pins with an angled end that gets around the problem.
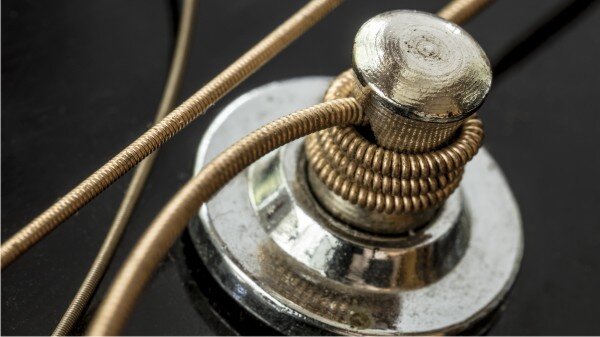
Wrapping The Tag End:
This is where the rubber meets the road. I can’t tell you how many times I’ve seen an instrument come in with barely a single wrap around the post:
…“it’s not staying in tune…”
Really? wonder why…
And, then there’s the opposite end of the spectrum where the tuning posts look like globs of spoon spun metal spaghetti.
There’s so much material coiled up there’s no chance of tuning stability.
Done correctly, there should be about three to four wraps around the post – the equivalent of about an inch and a half of straight string.
![]()
![]()
Using a standard hole-through-the-post tuner as an example, and assuming you don’t have locking tuners which get around the problem entirely, there are three typical methods of initiating the tag end wrap:
- Put the tag end through the post hole leaving about an inch and a half slack, give the tag end string a sharp right angle at the post to seat it, and start winding.
- Put the tag end through the post hole, again leaving about an inch and a half slack, take the tag end of the string and wrap it around the main length of string twice – creating a wrap lock, and start winding.
- Put the tag end through the post hole, wind the string up one full turn around the post, take the tag end and wrap it under then over the balance of the string once – creating a pinch lock, and wind the rest of the string up.
![]()

![]()
Whichever works for you is a matter of preference. the only way to determine that is to give them all a fair shot. Personally, I’ve had great success with all three methods.
String Selection
Throwing a set of 8 gauge strings on and playing Ramones tunes at double speed is a recipe for tuning disaster.
Let’s just say there’s an appropriate gauge for your particular playing style and taste in music.
Considering there really are no rules, and enough choices to choke a horse, there are still some fundamental laws of physics that we can’t get around in terms of string/instrument compatibility and stability.
Please make sensible choices if you want to keep your ears and your guitar happy.
Ok, let’s assume you have the right strings installed properly, what else can we look at?..
Check the Hardware
Your anchor points, whether at the bridge/tailpiece or headstock/tuners have to be rock solid – period.
Sloppy tuners will result in tuning problems, definitely. Although I have seen inexpensive tuners hold up, they’re typically a bad bet. The relative minimal cost of an upgrade is well worth it – and understandably, tuners are one of the first general upgrades most players consider for their instruments.
Keep in mind they still have to be installed properly. No sense putting Pirellis on you Porche without having the lugs torqued up properly – right?
Check the Nut
I have a box FULL of cleaved nuts. Usually the corner of the low E side is split off because:
- the instrument wasn’t setup properly and
- there was an oversized E string that did the dirty work.
Consider this, the nut is not only a string manager but a primary node for tone and intonation – it’s THAT important. Making sure your strings are not binding in the nut slots is a small thing, but a huge step towards staying in tune.
Remember to give it a little lube love too.
Other Setup Considerations
Speaking of intonation, that brings up two more points:
A comprehensive guitar setup will include accurate intonation which assures that notes ring true throughout the fretboard, therefore sounding in tune.
Every element has to be solid, including the bridge.
Sloppy saddles chatter and buzz, adjusters creep, and along with anything else that isn’t nailed down, causes grief with your tuning.
Address the issues head-on. Clean, adjust, repair or replace it as necessary.
A Word On Floating Bridges…
These animals are a bit more complicated. Good quality modern floating systems (Floyd Rose) are like thoroughbred racehorses. they require special attention to do what they were designed to do, but when they’re dialled in, they perform brilliantly.
Similarly, vintage style systems require a next level of attention which goes beyond the scope of this article. Let’s just say by hard-tailing a Strat style instrument (torquing up the tremolo springs until the bridge lays flat on the body) many of the tuning pains associated with the system are avoided.
Check Neck Relief
A poorly adjusted neck will usually take on the banana shape – too much air between the strings and fretboard around the midpoint of the fretboard.
It’s also a sign of neglect (wags finger).
Not only will the guitar be harder to play and sound out of tune, you can also have significant secondary issues like a rattling truss rod or worse, a totally ruined guitar.
STRETCH YOUR STRINGS!!!
![]()
I would cite this as the number one cause of strings drifting out of tune, and it’s such an easy fix.
True story:
I once had a popular local pro player who I considered very proficient and knowledgeable come in complaining about his guitar not holding a tune. I took a quick look at it and didn’t notice anything out of the ordinary as far as the general setup, then went on to see if the strings were stretched… nope.
Each one had a semitone or more of stretching left to do. I finished the process, tuned it up neat, played a few chords and it held fine. I handed it back to him saying something like, “There you go, just loose strings.” He says something like, “Really?…”
Makes me wonder how wide the gap of basic guitar knowledge and maintenance really is. Considering he was a pro it was – awkward.
Let’s go through the process…
Break Some Strings!
Sorry?… Yes, break some strings.
Buy some cheap strings, put them on and try to break them. Buy a few extras of the thinner singles for some extra fun too.
To know how to tune a guitar, and keep it that way requires radical action.
This is BY FAR the best way to find out how much abuse strings can actually take – plus it’s fun to do, cheap thrills.
Of course you want to make sure you’re not going to damage any critical points on a favorite instrument so please, exercise caution, wear protective gear and use some common sense.
I did this little experiment years ago when I first started working professionally as a tech – and that experience stuck with me in a most sublime way.
Once you get a feel for how much abuse a string will take, it sticks with you. It’s a great asset to use in conditioning strings for play.
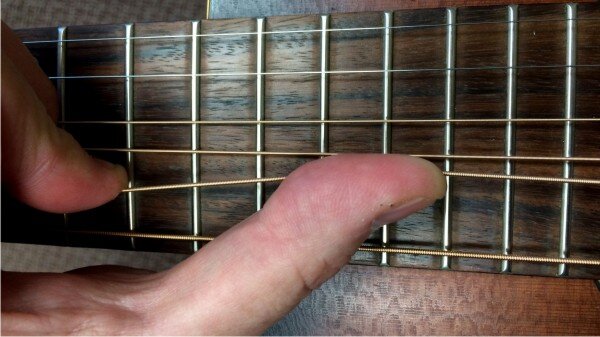
How To Tune A Guitar With New Strings
Now you can throw a new set of strings on and go about stretching them properly. And they should be stretched along their whole playing length. Give each a good tug vertically, up and down along it’s full length while keeping in mind it’s relative breaking point – but ease off of course.
Stay within seventy to eighty percent of it’s limit, that’s the sweet spot.
Use Fresh Strings
Brand spankin’ new strings properly installed will have a certain elasticity to them, they’re nice and “bendy”.
As they age they not only collect finger junk, they also tighten up and become brittle, changing the whole feel of the instrument and creating a tuning nuisance – creaking at the nut, squawking along their length and generally feeling like crap.
The easy fix is to change them out and keep them fresh, but what is “fresh” for one person is two years out for the next – no kidding, I’ve seen it and heard it first hand.
Let me put it this way, there are obviously a lot of variables: the brand, type of string, coated, non-coated, skin acidity, playing style, playing frequency… they all affect string stability and performance.
A fresh set of strings will remain robust – sonically – for about two to four hours. After that, we start to see degradation in the high end transients. The good news is this marks the beginning of a second very long phase, a nice extended plateau as the strings really settle in. This can last for weeks or months depending.
Thankfully, string stability usually remains constant during this whole time.
The bad news is, if your recording with brand new strings, it’s a shit show – sorry for the language.
If you have to go back and do overdubs or second takes for repair, you may be S.O.L.
Your tone will have changed – no way around it. Better to put a bit of time on your strings and get them settled in, then start recording.
Your engineer will thank you.
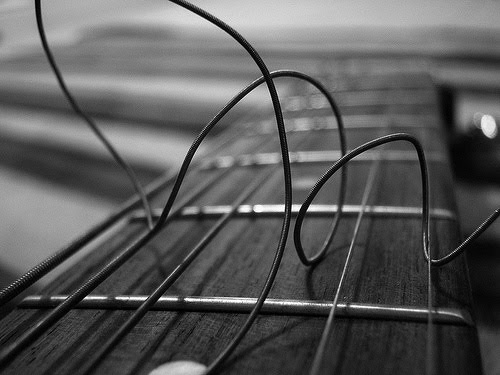
Which, logically, leads to the last phase, the long slow slide into the dark pits of psuedo-stringdom.
This is the point at which, unfortunately, I see a lot of neglected instruments come across my workbench. Sure all six are on there, but I would hardly call them strings anymore – more like organized cables.
Typical problem? – not staying in tune…
Anyway, I digress, back to stretching:
Here’s a quick video from the “How To Setup A Gibson Les Paul” series which illustrates the string stretching technique during the final phase of the setup process. If you’re interested in getting in tune FAST, pay attention to the method of using relative pitch referenced with a simple A440 tuning fork – quick and dirty!
A Quick Video Tutorial on String Stretching
Don’t OVERSTRETCH!
A little enthusiasm here can be counter-productive. Over-stretching the strings not only stresses the molecular limit, it can have a backlash effect. Instead of your string pitches drifting down as is typical, they will drift up! The strings will literally start to contract back to a more stable state thus raising the pitch.
Use the Appropriate String Tension
As mentioned previously, selecting the right gauge of strings will affect how well your guitar stays in tune.
Strings induce pressure on the instrument and some carry it better than others. Ultimately you want to settle on a set that feels right for you and sits well with your guitar.
Again, things like build quality, general setup and a host of other variables will have influence. The reason I bring this up is, let’s say you’re a jazz cat – super – but if you really want those 13’s to stay true on your guitar, make sure it’s setup for them.
Realize Strings Go Crazy From The Heat

Every guitar player knows about the effects of heat and how it makes predictable tuning stability nearly impossible.
Hot, sweaty clubs, sub-zero stages (that would be New Years Eve ‘95), body heat, practice rooms with excessive humidity and no windows, finger heat (yes, finger heat) all conspire to drive us nuts.
It’s the song that never ends.
Do you think seasonal changes and fussy guitars help this condition?
Nope, I didn’t think so.
The cure?
Use quality gear, make sure it’s properly setup – I mean PROPERLY setup, and stretch your strings. Instruments that have been given a reasonable amount of care will simply perform better.
Example: an old Charvel I had years ago sat untouched in the corner of my teaching studio for three months – lots of other toys competing for attention. I pick it up one day and boom! Spot on in perfect tune. A good quality instrument with a good setup – rock solid and dependable.
The Last Step: Give Your Guitar a Final Tuning
Everything is in place to tune up your guitar and be able to count on it staying in tune. Your enjoyment level can go through the roof once you’ve battened down the hatches, you know it’s as good as it’s going to be.
Should you be in the market for a decent modern tuner, check out this selection of tools of the tuning trade here:
Wrapping it Up: Now You Know How to Keep Your Guitar In Tune
Guitars are very much living breathing creations. They’re subject their surrounding environment, their handlers, and will let you know if they’re not happy.
Nothing is as satisfying for a guitar player knowing he can pick up his favorite axe, anytime, and just play – at the very least with a minimum of tuning fuss.
Keep yours in good nik, feed it fresh strings regularly and you will have a friend for life.
Now you know.


Kelsey Austin
It was about 20 years ago when my guitar teacher showed me how to restring my guitar. Three to four wraps then through the hole, just like you show. It works great, never had a problem.
But, I got curious about locking tuners. I tried some Sperzels, but I found them to be very stiff and difficult to fine tune. So I sent them back. Then I found Hipshot’s Griplock tuners.
The great thing about the Griplocks is that they are smooth with very easy to fine tune gear ratios. The open back shows the gears and really adds cool factor to my axe.
The real benefit of any locking tuners is tuning stability. Your strings won’t loosen because they are locked in place at the post. They also make re-stringing a much faster job.
Edward Adams
Great info on tuning keep UP the how to and downloads thanks